Friday, November 19, 2010

How To: Resize Partitions

Today I'm reinstalling Windows 7 on my remaining 1TB hard-drive. I currently have Ubuntu 6.10 installed in a 200GB partition, and the remaining 800GB is NTFS formatted for movies, music, photos, etc., to be shared between operating systems. The first step in my installation is to make room for windows, creating a 200GB partition from the current 800GB one. To do this I'm using GParted, a great GUI tool for editing, resizing, and moving partitions on a disk.

Here are a couple of helpful tips (and notes so I don't have to look it up again!):

1) Use MBR instead of GUID Partition Table. More support for MBR, it is old, but it's restrictions (only 4 primary partitions; max 2TB partition) don't usually interfere with most people's operations.

2) If you get an error, make sure to click on 'details' and then expand the arrows to find the cause of the errors. On my first attempt at resizing I didn't leave enough room for the original partition. To fix, allocate less space for the new partition.

3) The other error I encountered was something about a 'NTFS Journal file is unclean'. I think it was specifically ERROR(95). To fix, use ntfsfix /dev/[your_partition]. For me, it was /dev/sda1 that I was trying to resize, so [your_partition] was replaced with sda1.

Remember to sit tight, resizing (especially on a TB drive) is no laughing matter! Go for a bike ride, see a movie, and let it do its thing.

etc.

Tuesday, August 31, 2010

How To: Mount a Time Capsule from Terminal/Command Line

For the second or third time, I've had to save my macbook Air from destruction with the aid of my time capsule.

Here's the situation:
  1. MacBook Air is DEAD. (Mine specifically couldn't get past the spinning white loading screen...)
  2. MacBook Air only has one USB slot and no CD drive, so we need to boot up from the Install disk with the external drive, taking up our USB slot. (Note: Using a USB hub doesn't allow me to boot from the disk externally... maybe people have had other successes)
  3. We want to save our HD data before reinstalling, but we can't plug in an external HD while the disk is plugged in, so
  4. WHAT TO DO?
  5. Time Capsule!!
Before you start, realize that copying any portion of your harddrive over WiFi to the TimeCapsule is absurdly slow. Also, a little experience with Terminal doesn't hurt. Here we go!

How To Open Terminal:
  1. Boot from the disk - hold down the alt key while starting up with the install disk.
  2. Choose the MacOSX Install Disk to boot up.
  3. At the Install screen, go up to Utilities in the toolbar, and open Terminal.
How To Mount TimeCapsule:
  1. Make a place to mount the TimeCapsule with: mkdir /Volumes/TimeCapsule
  2. Mount the TimeCapsule with: mount_afp -i afp:/// /Volumes/TimeCapsule
  • ip is the IP of the TimeCapsule (mine was 10.0.1.1).
  • folder is the root folder of the TimeCapsule (the 'SharePoint')
  • -i means Interactive Mode, so it will prompt you for your Username and Password.
  • The User will be the user of your computer (not the lowercase version), so mine was Nicolas Williamson, and Password is the password for the TimeCapsule when you originally set it up.
How To Copy Files:
  1. Make a directory on the TimeCapsule for your backup files with: mkdir /Volumes/TimeCapsule/Backup_Date
  2. Go to your harddrive with: cd /Volumes//Users/
  3. Copy any files you need from Documents or Desktop (or anywhere else) with the cp command. Note: If you are copying a folder use the -r option, and use the -v (verbose) option to see what files are copying (otherwise it can feel like it's not doing anything!). Ex: cp -r -v Documents /Volume/TimeCapsule/Backup/

Wednesday, August 5, 2009

Funny Spam

Usually I don't take the time to read spam subjects before I delete them, but today was such a good batch I thought I'd share them!

  • Your long rocket takes her high!
  • Bring her to the Seventh Sky!
  • Never thought he would be able to cream his croak...
  • Barak's wife home video - Clear up that acne today!
  • You will never have problem with getting super bone-on!
  • Fast response of your meatstick!

Tuesday, April 14, 2009

Pacman

Pacman, in all his classic glory, is now to your right. Enjoy!

etc.

How To: Academic Planning Tool


Academic Planning Tool is brought to us by the Cornell APT Project Team, and is very similar to familiar software like Schedulizer and Classifier. However, it allows us to plan out our entire 4 year schedule at Cornell, letting us see if we can fit all of the wonderful classes we want to take into 4 cramped years, or if that other minor we want to take is viable. It lets us distribute classes around to even out credits, and its interface and Courses of Study browser is the best I could have hoped for. For those who haven't yet jumped on the APT bandwagon, here's a small tutorial on how to get started!


2) Click on the right hand side to register. All you need to sign up is a NetID.

3) Click the big orange 'Launch' button to download the java web app launcher. Open this file.

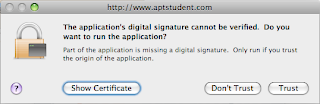
4) When Java is starting up, you might be told that the application's digital signature is missing - just click trust.

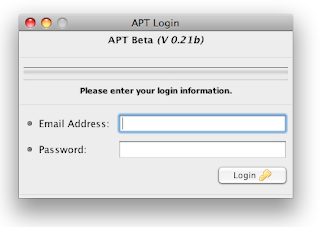
5) Enter you NetID@cornell.edu and password sent to you in a confirmation email when prompted.
6) The application should have started up for you now. Once you're up an running the first thing to do is click on User Settings and Change your Account Password.

7) Apply those new settings and then click on Edit Layout. Change your start and end semester to the correct dates (if you've already added classes in the wrong 4 years, drag them to the 'Course Cart' to save them, then change the layout; drag them back into place).

8) At this point you are now set up and ready to add classes. Select any spot and start typing - APT will automatically generate a list with all of the possible classes based on what you type. When you've found your class, click it and press enter.


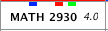
9) This is an example of what you'll see. It includes the department, course number, credits, and my favorite, the sessions the class is offered. Blue = Fall, Light Blue = Winter, Red = Spring, and Green = Summer. These are all drag-and-drop-able, and if you think you want to add a class but don't know where to put it yet, throw it into the 'Course Cart' for later!

10) Additionally, if you select the class, APT finds all relevant information and displays it at the bottom. You can see the full Description, Cross-Listings, and past grade medians for many classes.

11) Clicking on Course of Study at the top left brings us to the search feature. It's very easy to find any class quickly, and you can see all classes in Department/College Views, or do an Advanced Search. The advanced search feature also lets you pick out liberal studies easily.

12) When you're done laying out your future, remember to click on Save!!

Congratulations on successfully using Academic Planning Tool! Happy planning!


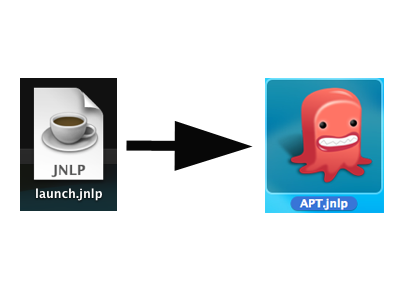
Fun Tip) Rename the 'launch.jnlp' file to something better like 'APT.jnlp', and change the icon.
etc.

Monday, April 13, 2009

Catch-Up

It's been a while, so I thought I'd put up some quick updates since my last post:

- Planning on learning/working on iPhone Cocoa application programming this summer; working with fellow Cornellian and longtime friend Alex Ainslie. I've got a sweet idea for an app called DockPlus - more on that later!

- Schoolwork
+ Grades are still good - applying for Barry M. Goldwater scholarship next year!
+ Begun preliminary designing of simulated neural net. Considering I haven't studied those yet, I'm sure there are much better ideas out there, but I think I've got a good start!
+ Just discovered APT, a MUST HAVE for ANY Cornell student! I did this myself in excel (what a bore...) and thought that I or someone else must eventually come up with this, so thank you Andrew Hurrell!

- Last blog with Alex (yoworld!) was a bust - never really got a feel for the tumblr interface... <3 Blogger

- Weather is finally starting to get nice! Sunny and over 50 this whole week! Yikes!

- I think facebook should implement blogging - they would officially rule the world... and then be bought up by google ;)

- Alex is working at google this summer (jealous) and I'm trying to eek out a stipend to work in my biorobotics lab; I'm actually a bit useful now though!

- Been mountain biking with my class TWICE now = half way done. Last week included a lot of falls and a nicely executed faceplant! (pic later I hope)

- Nic Jr. and Ryan Jr. II are (still) alive and well (for now). <- my fish

- I have David Diamond playing on my iPod right now, and am loving life!

etc.

Wednesday, December 3, 2008

Project Euler, and stuff!

Project Euler is a great place for finding fun and interesting algorithmic problems that also delve into mathematics. I've currently done the first 14 (of 219... quite a ways to go...) and it's really honing my optimization skills. Any algorithms I come up with for Project Euler will get the tags Project Euler and Algorithms (as soon as I make those tags!).

From my searches on the net, there hasn't been much info or help on using cross-compiled libusb code for ARM (or anything else), so in case some poor soul looking for help finds this humble blog, I hope I can be of assistance!

And basically anything that I figured out that might be helpful in some way to anybody, I'll throw up here for good measure - both so that I don't forget it, and so people can benefit.

Good luck!

Nic